Environment

Environment

Saturday, February 18, 2023

Time for Gravel 1

We're fed up with the very good soil in our orchard. The nasty weeds love it far too much, especially the ones with the nasty prickly seeds that stick to dog paws. A few container bags of the stuff each year, followed by meter high Malva. Pretty pink flowers, but indestructable. 

We don't do RoundUp, so it's geotextile + gravel, after engineer De Waal managed to remove ALL weeds. By hand.  Ramblizo has rolls of geotextile that are 4 meters wide, which reduces the number of seams. We still have sewn more than 100 meters I think. With a different stitch later.

This is the first half of the orchard, done summer 2022.


Neatly overlapped and sewn.


Arrival of 10 bags (4 more later)


Tex being helpful, or not

Ready!


AAAARGHHH!


Coco plucked

Now that Coco is getting older, she gets bristly hair. You can brush her all you want, but those hairs won't come off. But, if you pick at them, with your thumb and finger, they come off! Never knew this! And look now! We have a completely smooth young lady again! (And she loves this plucking!)

Even her ears. What a difference!


Tejado 2

In Tejado Engineer Jansen described work on the roof, in September 2022. It is now February 2023, and no, he has not finished yet.  

The east part of the roof (pic below) has now been totally PUR-red and the ends are filled with lime mortar. What remains to be done to this roof half is put a bit of lime mortar on the cement arcs that were not replaced, for consistent color of the roof. Now there are dark patches where there is no new white blob of lime mortar. 

yes, the walls are still having the barra Sahara mud rain stains

Last thing is: paint the sides, on the seams, with LANKO, a flexible cement originally intended for water basins.

Now for the west side

Same procedure. Test every cement arc  at the end of the roof tiles if they are loose. If so: remove. See if there are remaining loose cement bits with a piece of iron wire bent into a small hook.

Then see if the tile itself is still firmly affixed. If not: remove, clean the sides with a copper brush. Clean the cement ridges where the tile was sitting, we want the tile to be exactly where it was, so no grit in between. Wet both tile and seat with a spray of water from the hose (spray gun), then apply PUR para Tejado to stick the tile in place. 

yes, that is a bird's feather and remains of nesting material

fill the grooves where the tile was sitting with PUR

stick the tile back in place, a thin layer of PUR glues it to the roof
the end opening also is filled WITH PUR, it will still get a blob of lime mortar

When the PUR has hardened remove sPURious (ha ha ha) PUR with palet knife, put blob of lime mortar in the end openings. As the top rows here, bottom rows still have unremoved old cement:


For the west end all tiles have now been PUR-red. 


Now the engineer is rather exhausted, his joints ache, his fingers are tired, and he's feeling old.  These last pictures are January 29th 2023. Awaiting better weather and restored health.

Next step is remove spurious PUR, apply lime mortar blobs, and paint sides with LANKO.

Estimated two more months of work, as you can only do this a few hours per day max.

Results

There are great results too.

The roof no longer leaks, even though the roof tile sides still need treatment with LANKO. 

Another great thing is that we no longer have grit in the house when it is windy. In the past we always had some grit along the central wall in the living room, and in the second bathroom. We even put up a row of IKEA cupboard to catch the grit in the living room. Not necessary any more. The canals under the roof tiles were all connected, and connected to the canal under the roof ridge. That is where the bat was, too. And because of missing cement arcs the canals were connected to the outside, too. So, wind blew the sand that is in those canals into the house. It was not that the gypsum layer was crumbling, that is fine.

It also explains why we always had wasps upstairs in the house in summer, despite all windows having mosquito screens. Where there were openings wasps got in, made little wasp nests under the roof tiles, and by mistake also came into the house. 

Sorry, wasps, bats, birds. 


Tuesday, October 18, 2022

Mind the gap - terrace door

 The upstairs terrace door needed some work. 


Not just that, when it rains we always have a puddle of water behind that door. 

Engineer Jansen has spotted why. Can you spot it too? 

Congratulations, you spotted the ansteystyle gap.

Here is a solution. An iron T-bar was added to the door threshold, so the gap is removed. The door now rests against the T-bar, no gap.


To keep water out of the house,  at the bottom of the door there now is an aluminium profile that makes water fall off on the outside of the T-bar. 

A little silicone for water proofing.


Hm, the alu profile is a bit off the door at the lower part. However, there is some silicone there.


If it rains very very hard water may still get in, there still is a small gap at the side:


If that happens the engineer will add a tiny extra aluminium profile.


Wednesday, September 21, 2022

Tejado

Tejado is the Spanish word for roof. We have a very old classic tejado. It is constructed by putting wooden beams on top of the walls, and perpendicular to that thick reeds. On top of the reeds they apply a layer of sort of mortar. That sort of mortar is a soft mixture of clay and gypsum. On top of that are placed the classic arabic tiles.  

This tejado probably is 100 years old, the beams have porcelain electric insulators in some places that were used up until 1925, nicely dating the roof before 1925. Basically the roof is fine, these tiles are very strong and thick terracotta. But, certainly the roof ridge needs maintenance. The rest of the roof has the tiles alternating up-down-up, and at an angle, so in principle that cannot leak. But the roof ridge is just horizontal tiles on top of some cement, with the end openings filled with mortar. And, most tiles there were loose, and/or with gaps, and many end bits missing or cracked. That should explain the leaks we have experienced last winter!

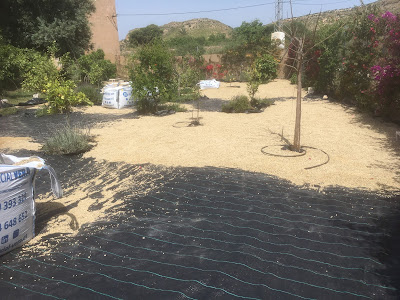
Our constructor has worked on the roof a few years ago, but did not have enough time for more work short term, and the rainy season is approaching.

Engineer Jansen does not really suffer from vertigo, but does not like the idea of moving around a tilted roof. Even if it is not a steep roof.  Yet he got over his fear, tied the ladder tightly to the chimney, hauled up 4 foam mattresses to be able to crawl over the roof on his knees, and inspected the roof. He did not like what he saw. 


And (sorry it's not sharp, the engineer was shaking):


There are 41 tiles in the roof ridge, about 35 were loose and could easily be removed, like this:


Note the marker lines that tell how they were positioned before removal. Also note that this bit is filled with some mortar, but the mortar did not touch the tile, so that was just held in place at the sides, and by sticking under the tile before, and overlapping the next tile.

Where the tiles overlap they should have some (lime) mortar, but they did not, any more.


In the picture above you can see that the ridge is filled. And the filling is.. dry soil and some stones.  Engineer Jansen removed all that dirt using the ash vacuum cleaner that we normally use to clean the pellet stove. 


About 40 liters of rubbish was removed:


As this was a job that could not be done in one day the tiles were put back, fixed with bags of gravel.


To fill the roof ridge Engineer Jansen went back to a classic building material: lime mortar.  Why? Because lime mortar is soft and flexible, and old tiles need that. If you use a modern cement the joint will be very hard and inflexible. What happens when the construction ages and the mortar is at end of life (50 years) a modern cement cracks and breaks the brick or tile that it is fixed to. When a lime mortar joint breaks the lime mortar breaks, but leaves the tile or brick undamaged.  Old bricks and tiles are not as hard as modern ones, though these roof tiles are STRONG!

Various restorations explained in youtube videos made use of a 3 : 1 : ca. 0.8 sand : lime : water (by volume) mix.

Lime is available here: Gecol Cal de Construccion


There are more lime mortar products, Gecol advised Gecol Sec cal-H, but not readily available.

The difference is that Cal de Construccion is just 95% lime, and you have to add aggregates like sand and bits of stone to make a mortar. The other products are readily mixed. If you are interested (yes you are) see Gecol Lime Mortars.

(I went to the local building materials supplier, to ask for an advice. The expert was called, who told me Gecol Cal was mainly portland cement. It isn't, it's 95% pure lime. So much for the experts. They don;'t know anything about lime mortars.)

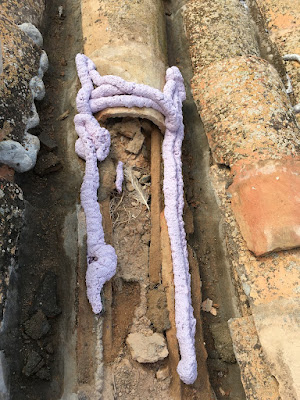
Anyway. Besides lime mortar the engineer did use a modern product:  PUR foam for tejas. Recognize the tiles on the label?

This is a different PUR than regular yellow PUR: it does not expand much, and is more a glueing foam than a filler. The color is purple initially, but changes color to sort of grey-green when it hardens. 

Planned to use just a blob at the ends of the tiles, but decided to use more, as it turned out to be very difficult to actually stick the tiles in place with just lime mortar. The how-to videos showed that they use a blob of lime mortar to fill, and on top of that a line of pur to glue the tile. 

The pur also peeped through the joints at the side, which is not bad actually. When hard the surplus is easily removed.

To fill the joints, with the PUR scratched out, another product: Lanko 227 Imper Megaflex, a cement-ish product that contains fibers. It's usually used for repairs and to fill cracks. It adheres well to both cement and ceramics. So. 

It's expensive too, a 15 kg bag is €75.  For the roof ridge I have used 2 kg, but the rest of the roof will need more. You need to use an exact amount of water, and mix it with an electric drill mix thing to sort of a toothpaste consistency. Then you can fill your cracks, using a spatula or a brush. I used a paint brush mostly. One layer already looks fine, but the instructions tell you to apply two coats.  Engineer Jansen obediently did so.


Well. We will see if this improves the roof. That really is necessary, last winter was cold and wet, and the roof was also cold and wet, and leaked. Not really a lot, but a drop of water every few minutes is quite irritating. 

Secondly, the gypsum layer under the roof tiles gets damp, which makes it lose any insulating properties it might have had.  And heat that touches a wet roof vanishes. 

Thirdly, after filling the gaps we had a bat in the living room.  In total silence it swooped around the room. Poor thing, it probably lived in the roof ridge, slipping in and out through the gaps, that are now filled, so the only exit was to the inside of the house. (Removed the mosquito screens to let it out.) As the bat could slip into the living room from the roof ridge, probably warm air could slip out, too.  

We can properly heat the ground floor with the pellet stove, but could not maintain a comfortable temperature upstairs for longer periods.  Which makes sense now, I think. We'll see how it is this winter!

(This was a whole week working HARD, up and down the ladder, about 100 kg mortar was processed, the engineer is not that young any more, obviously.)


Wednesday, May 25, 2022

More shade

We like sun, but sun + shade more.
We should live in a big tent..


Kitchen worktop de-oiled

Followup on https://jansenendewaal.blogspot.com/2017/11/aanrechtblad-olien-kitchen-counter-oil.html

One of engineer Jansen’s less great decisions was to *not* wipe off any excess oil after oiling the kitchen worktop. It was so nice and shiny:

A few years later the punishment comes, as the excess oil transpires out of the wood and becomes a sticky goo, worse than chewing gum. Covering it with clingfilm makes things even worse, as scraping it off gets even more difficult. Your lord in heaven has been called a few names this morning.

All this to prepare for a new and shiny inox sink.

Scraping off the goo, and the clingfilm


Sort of de-oiled the worst part.


Geotextile and gravel


Nobody peed here before!

Geotextile all laid down, tomorrow 8m3 pebbles.


8m3 pebbles


Tex being very helpful


All done

Uh oh. AAAARGH! 8m3 is not enough, we need 4m3 more


Apparently you need a layer of about 5 cm for gravel, while we aimed at about 3 cm. Well, gravel is not expensive here, less than 30€ for 1 m3, 24€ transport cost for the total delivery.